Bending Light in a Fragment Shader: Real-Time Gravitational Lensing in the Browser
Building an interactive Schwarzschild lens with React Three Fiber, GLSL, and one mid-build architecture pivot. Plus the JWST Pandora's Cluster recursive joke at the end.
View Live DemoReal-time Schwarzschild gravitational lensing in 80 lines of GLSL, with one architecture pivot halfway through.
The Hook
On 29 May 1919, Arthur Eddington (a 36-year-old British astronomer) was on the island of Príncipe off the coast of West Africa, photographing a total solar eclipse. He was there to do the most expensive photo retouching job of all time: prove that mass bends light.
The job: photograph stars near the eclipsed sun, compare those star positions to the same starfield photographed at night months earlier, and check whether the stars near the sun appeared shifted by the amount Albert Einstein had predicted four years prior. If they were, general relativity was right. If they weren't, Newton was right and the world made sense.
The stars were shifted by the amount Einstein had predicted. The Eddington experiment became one of the most famous confirmations in 20th-century physics.
I wanted something you can drag around in a browser and feel happen in real time. This is how I built it.
What It Does
Try the demo and you can:
- Drag a black hole anywhere on the screen with your cursor or finger
- Slide its mass across nine orders of magnitude, from a stellar-mass remnant to an ultra-supermassive monster
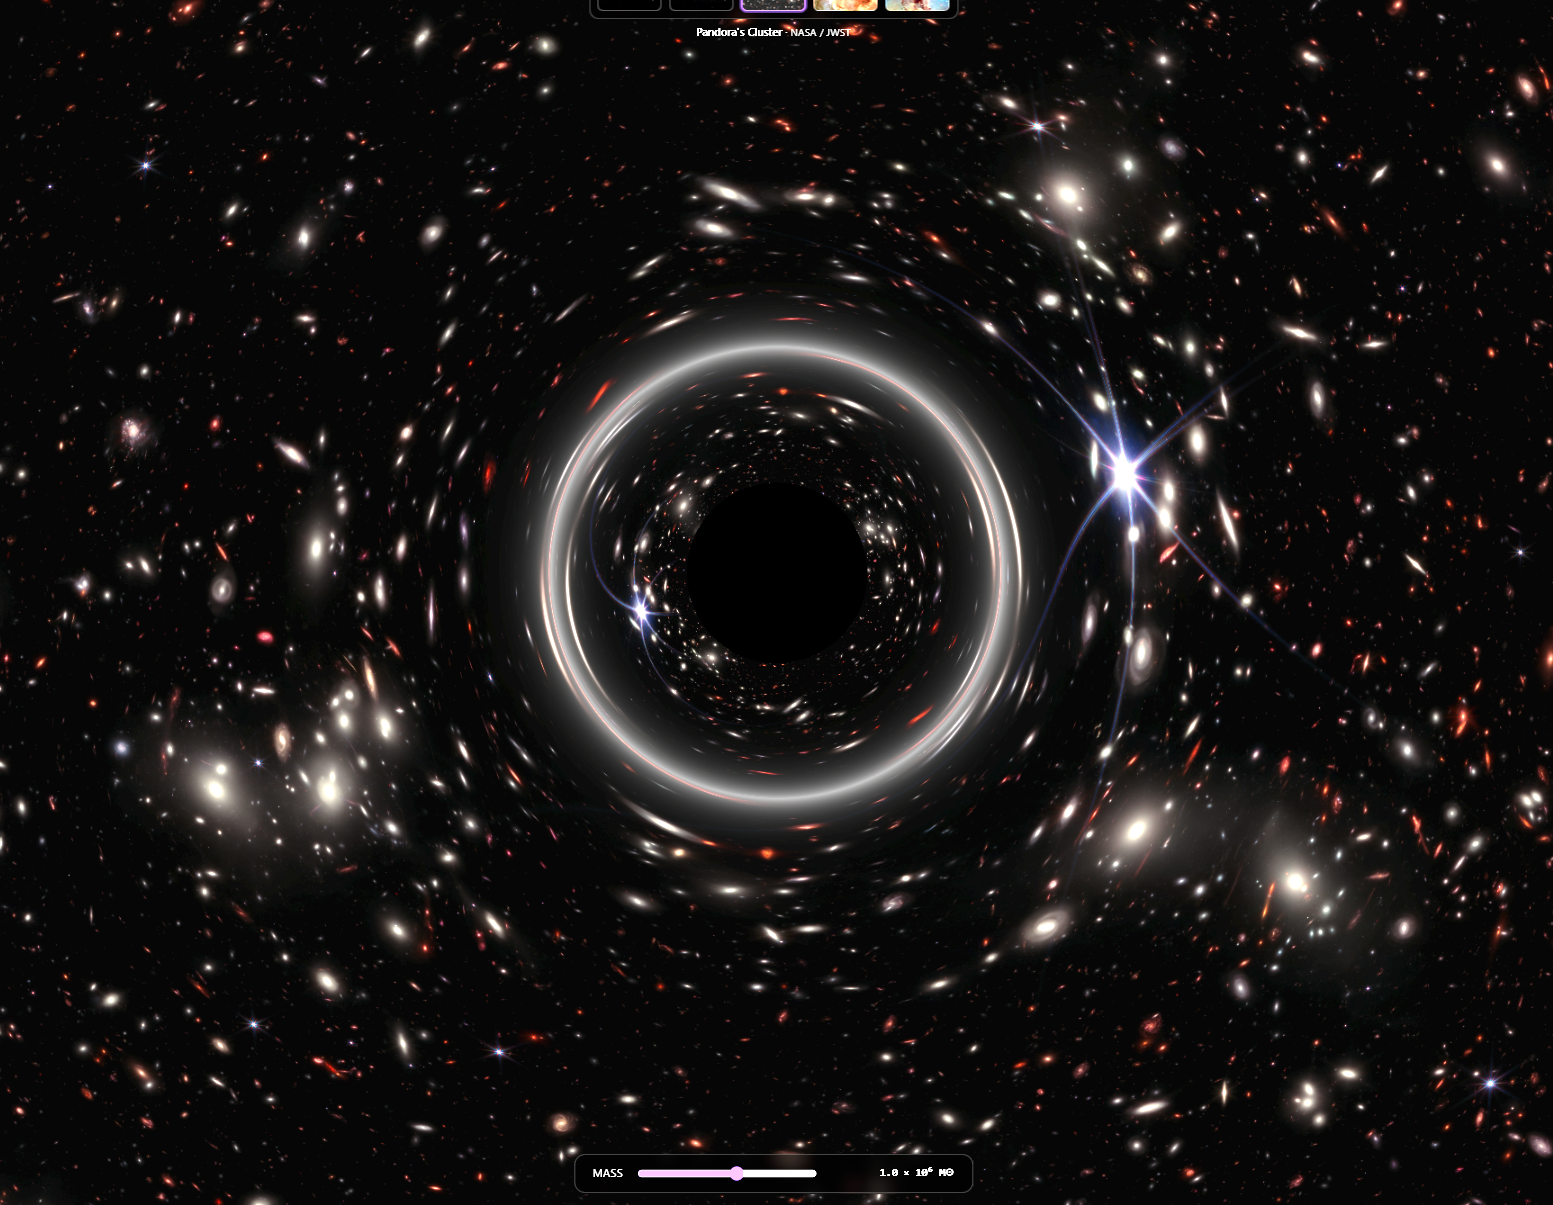
- Swap the background between five real-world space images: a starfield, the Milky Way, JWST's Pandora's Cluster, the Carina Nebula, and the Pillars of Creation
- Watch the Einstein ring form, dissolve, and re-form as the lens passes over bright sources
- Notice the recursive joke: the JWST Pandora's Cluster image is itself a real gravitational lensing observation. Lensing the lensed image is the moment the demo earns its keep. More on that later.
The whole thing runs as one fragment shader on a fullscreen quad. No real-time geodesic raytracing, no preprocessed lookup tables, no backend. Open the page, drag your mouse, and you're doing 1916-era physics in your browser.
Switching to Screen Space
The first version of this got the math right and the visuals wrong.
I started with a textbook approach: render a 3D sphere skybox with the background texture mapped onto it, then write a fragment shader that bends light from each point on the sphere around the lens before sampling the texture in the deflected direction. Treat the texture as an equirectangular projection, sample with atan2 and asin, done. Phase 1 of the build was up and running in an hour.
It looked great on the starfield. It looked broken on every other background.
The reason: equirectangular panoramas are 360° × 180° images with a 2:1 aspect ratio, designed to wrap fully around a sphere. The starfield and Milky Way images I'd reused from another experience on this site happen to be true equirectangular maps. The JWST images (Pandora's Cluster, Carina Nebula, Pillars of Creation) are photographs. They're flat, with normal photo aspect ratios, capturing maybe a fraction of a degree of sky each. When I sampled them as if they were 360° panoramas, the camera's 60° field of view only saw a sliver of the original image, and that sliver got stretched across the entire viewport. Visually, the backgrounds looked permanently zoomed in.
There were two ways to fix this:
- Convert all the photos to fake equirectangular panoramas by stuffing each one into the center of a black 2:1 image. Lossy, ugly, and the lens math would still produce weird stretching at the edges of the photo where the black space began.
- Throw away the sphere skybox entirely and switch to a fullscreen quad post-process operating in 2D screen space. The texture stays a regular image. The lens equation gets applied in screen coordinates instead of on a sphere.
Option 2 is what I shipped. The pivot took about an hour, deleted more code than it added, and made the shader faster (no Rodrigues rotation, no acos). It also unlocked the recursive joke. Being able to lens the JWST Pandora's Cluster photo at its native aspect ratio is the moment the demo gets memorable.
The lesson is the same one I keep relearning: start with the simplest representation that matches your data. I'd reached for a sphere because the physics paper I was reading talked about angular separations and great circles. But the data I actually had (photographs) wanted to live in 2D the whole time.
Schwarzschild Lensing in ~80 Lines of GLSL
For a light ray passing close to a non-rotating black hole, the deflection angle is:
α = 4GM / (c² b)
where G is Newton's gravitational constant, M is the mass of the lens, c is the speed of light, and b is the impact parameter (the perpendicular distance from the line of sight to the singularity). This formula falls out of the Schwarzschild solution to Einstein's field equations, which Karl Schwarzschild derived in 1915 and published in January 1916. It's what Eddington's photos confirmed three years later.
For the simulation, we care about the visual scaling: how much does the apparent position of a background source shift as a function of its angular distance from the lens? The answer comes from the point-mass lens equation:
β = θ − θ_E² / θ
where:
- θ is the apparent angular position of the source (where it shows up on the screen)
- β is the true angular position of the source (where it would be without the lens)
- θ_E is the Einstein radius, the angular radius at which a perfectly aligned background source forms a complete ring
When θ = θ_E, β = 0. That's a perfect alignment, and you get the Einstein ring. When θ >> θ_E, β ≈ θ, so the lens is too far away to bend the light noticeably. When θ < θ_E, β goes negative, which means the source is on the other side of the lens. That's the strong-lensing regime where you get a second, inverted image.
For the shader, I needed to invert this: given an apparent direction (which fragment am I rendering?), find the true source position (which texel should I sample?). Same equation, just used in reverse. Each fragment knows its own position, we compute θ from the lens, plug it in, get β, and rotate the apparent direction toward the lens by (θ − β) to get the true source direction.
Here's the actual fragment shader (slightly trimmed for readability):
precision highp float;

uniform sampler2D backgroundTexture;
uniform vec2 lensCenter;        // lens position in UV space (0..1)
uniform float einsteinRadius;   // in aspect-corrected NDC units
uniform float screenAspect;     // viewport aspect ratio
uniform float textureAspect;    // texture aspect ratio

varying vec2 vUv;

void main() {
  // Convert UV to aspect-corrected NDC. Stretching X by aspect makes the
  // coordinate system isotropic, so a circle of radius R looks like a true
  // circle on screen regardless of viewport aspect.
  vec2 ndc = (vUv - 0.5) * 2.0;
  ndc.x *= screenAspect;

  vec2 lensNdc = (lensCenter - 0.5) * 2.0;
  lensNdc.x *= screenAspect;

  vec2 delta = ndc - lensNdc;
  float r = length(delta);

  // Event horizon shadow: solid black
  if (r < einsteinRadius * 0.4) {
    gl_FragColor = vec4(0.0, 0.0, 0.0, 1.0);
    return;
  }

  // Inverse lens equation: beta = r - thetaE^2 / r
  float r2 = einsteinRadius * einsteinRadius;
  float rTrue = r - r2 / r;

  // True source position in NDC, then back to UV space
  vec2 trueNdc = lensNdc + delta * (rTrue / r);
  vec2 trueUv = vec2(trueNdc.x / screenAspect, trueNdc.y) * 0.5 + 0.5;

  // ... cover-fit aspect correction + texture sample + ring glow ...

  gl_FragColor = vec4(color, 1.0);
}
Three things worth flagging:
Aspect-corrected NDC. In normal NDC coordinates (-1 to +1 on both axes), a circle of radius 0.5 looks like an oval on a 16:9 screen. Stretching the X axis by the viewport aspect ratio makes distances isotropic, so a circle of radius R is a true circle on screen. The lens has to be circular to match physical intuition, so this matters.
The r < 0.4 * θ_E shortcut. Real Schwarzschild black holes have an event horizon at the Schwarzschild radius, which has a fixed relationship to the Einstein radius only at certain distances. I picked 0.4 × θ_E because it's where the visual chaos of the strong-lensing regime gets too messy to read on screen, and replacing it with a clean black disk makes the lens read clearly as a black hole. It's a visual choice.
No loop, no branching past the horizon check, one texture sample. This shader runs at native resolution on a phone GPU. The whole reason a real-time lensing visualizer is possible at all is that the math is this cheap when you don't try to integrate full geodesics.
Wiring the Cursor to a Black Hole
The interaction is the reason this is a demo. Making the black hole follow your cursor turns out to be a few lines, with one annoying subtlety.
The hook:
export function useBlackHoleDrag() {
  const containerRef = useRef<HTMLDivElement>(null);
  const [lensCenter, setLensCenter] = useState<[number, number]>([0.5, 0.5]);

  useEffect(() => {
    const el = containerRef.current;
    if (!el) return;

    let pending: [number, number] | null = null;
    let rafId: number | null = null;

    function flush() {
      if (pending) {
        setLensCenter(pending);
        pending = null;
      }
      rafId = null;
    }

    function handlePointerMove(e: PointerEvent) {
      const rect = el!.getBoundingClientRect();
      const u = (e.clientX - rect.left) / rect.width;
      const v = 1 - (e.clientY - rect.top) / rect.height; // flip Y for UV
      pending = [u, v];
      if (rafId === null) {
        rafId = requestAnimationFrame(flush);
      }
    }

    el.addEventListener('pointermove', handlePointerMove);
    el.addEventListener('touchmove', (e) => e.preventDefault(), { passive: false });

    return () => { /* cleanup */ };
  }, []);

  return { containerRef, lensCenter };
}
Three things this does that aren't obvious:
Pointer Events handle both mouse and touch. The Pointer Events API gives you a single event type that covers desktop cursors, touchscreens, and styluses uniformly. One handler covers both mouse and touch across platforms.
The requestAnimationFrame throttle. Pointer events fire at hardware rate (1000 Hz on a high-end gaming mouse). Calling setState 1000 times per second would queue 16-17 React renders per frame, which is wasted work. Stashing the latest position in a closure variable and flushing it once per rAF collapses everything to one render per frame, which is the maximum the screen can show anyway.
The touchmove preventDefault. On phones, dragging your finger across an HTML element scrolls the page by default. We want it to drag the black hole instead. Calling preventDefault() on touchmove (with { passive: false } so the call actually takes effect) disables the native scroll. The CSS touch-action: none on the container reinforces it.
The other UX gotcha is one I hit later: the slider and info button are sibling elements to the canvas, and pointermove was bubbling from them up to the container, which made the black hole teleport to the slider every time you tried to drag it. The fix is one line on each interactive overlay:
<div className="gl-controls" onPointerMove={(e) => e.stopPropagation()}>Stop the propagation, the BH stays put, the slider works. This is the kind of bug that takes ten minutes to spot and one line to fix, but only if you know to look for it.
The Texture Warmup Saga
The bug that took three attempts to fix.
When you click between background presets, the swap should be instant, since we're just changing one pointer in a uniform. But the first time I tested it, there was a small but visible jolt the first time each preset was shown. Subsequent swaps to the same preset were smooth. Only the first time stuttered.
This is a classic graphics-pipeline lazy-evaluation issue, and Three.js has three layers of it.
Layer 1: Image decode. When useLoader(TextureLoader, path) resolves, you have a Texture object whose image field is an HTMLImageElement. The image has been downloaded, but the browser may not have decoded the JPEG into a bitmap yet. The decode happens lazily, often at first render.
Layer 2: GPU upload. Even after the image is decoded, the actual upload from system RAM to VRAM doesn't happen until Three.js needs to draw with the texture. The first draw call is what triggers it. For a 4 MB image, that's a real cost, easily 50-100ms on a mid-tier GPU, blocking the render thread.
Layer 3: Shader-texture binding. Even if the texture is fully uploaded, the first time the GPU sees it bound to a specific shader program, the driver does some lazy binding work: sampler setup, uniform binding patches, format validation. This is the most subtle of the three because it's per-(texture, shader) combination.
My first fix only addressed layer 2:
textures.forEach((texture) => gl.initTexture(texture));renderer.initTexture() is a Three.js API that explicitly forces the GPU upload. After this call, the pixel data is in VRAM. Problem solved, right?
No. The jolt was smaller, but still there. Layer 3 (the per-shader binding) was still happening on first use.
The actual fix is renderer.compile(), which prepares an entire scene's worth of materials and textures for rendering without actually drawing anything. The trick is to feed it a temporary scene that has each texture already attached to a ShaderMaterial using your real shader:
useEffect(() => {
  // 1. Configure each texture's parameters
  textures.forEach((texture) => {
    texture.wrapS = THREE.ClampToEdgeWrapping;
    texture.wrapT = THREE.ClampToEdgeWrapping;
    texture.colorSpace = THREE.SRGBColorSpace;
    texture.minFilter = THREE.LinearFilter;
    texture.magFilter = THREE.LinearFilter;
    texture.needsUpdate = true;
  });

  // 2. Build a throwaway scene with one mesh per texture, all using the
  //    real lensing shader. compile() will warm up every texture-to-shader
  //    binding before the user sees the experience.
  const warmupScene = new THREE.Scene();
  const warmupCamera = new THREE.PerspectiveCamera();
  const disposables = [];

  textures.forEach((texture) => {
    const material = new THREE.ShaderMaterial({
      vertexShader: VERTEX_SHADER,
      fragmentShader: FRAGMENT_SHADER,
      uniforms: { backgroundTexture: { value: texture }, /* ... */ },
    });
    const mesh = new THREE.Mesh(new THREE.PlaneGeometry(2, 2), material);
    warmupScene.add(mesh);
    disposables.push({ geo: mesh.geometry, mat: material });
  });

  // 3. The key call. Walks the scene, compiles the shader once, pre-binds
  //    every texture-to-shader combination. Doesn't draw anything.
  gl.compile(warmupScene, warmupCamera);

  // 4. Belt-and-suspenders: also explicitly initTexture each one
  textures.forEach((texture) => gl.initTexture(texture));

  // 5. Cleanup
  disposables.forEach(({ geo, mat }) => { geo.dispose(); mat.dispose(); });
}, [textures, gl]);
After this runs, every texture has been through the full pipeline: decoded (covered by useLoader), uploaded (covered by initTexture), and pre-bound to the actual shader (covered by compile). The first preset swap is now indistinguishable from the tenth.
The whole warmup adds maybe 200ms to the initial "Loading the cosmos…" overlay. In exchange, every interaction afterward is smooth. That's the trade I want every time.
Lensing the Lensed Image: Pandora's Cluster
Pandora's Cluster is in the preset list for a reason.
Pandora's Cluster (formal name Abell 2744) is a galaxy cluster about 4 billion light-years away, itself the result of a simultaneous pile-up of at least four smaller galaxy clusters. That's how it got the "Pandora's box" nickname. In February 2023, NASA released a JWST image of it showing thousands of background galaxies smeared into arcs and rings around the cluster's foreground galaxies. NASA described the cluster itself as "a powerful gravitational lens, a natural magnification effect of gravity."
Those arcs are real gravitational lensing. The cluster's mass is so concentrated that it's bending the light from galaxies behind it, magnifying and distorting their images. Lensing is the whole reason JWST could capture those distant galaxies so clearly, and Pandora's Cluster is one of the most photographed gravitational lenses in modern astronomy.
So when you load this preset and drag the black hole across the image, what you're doing is lensing an image that is already a record of real gravitational lensing. You're nesting a fake lens inside a real one. The arcs you create with your cursor obey the same equation as the arcs JWST captured for free.
I didn't plan this when I started the project. I was looking for visually striking backgrounds and Pandora's Cluster was already in the repo from another experience. The recursive nature only clicked for me halfway through Phase 4. It's the kind of accident that makes a side project feel like more than the sum of its features.
A century after Eddington's photos, you can recreate the experiment with your cursor. That's the reason this exists.
What I Learned
A few things I'll carry into the next experience:
-
Match the data shape to the algorithm. I burned a phase building a sphere skybox before realizing the data wanted to live in 2D. The math stays the same in any coordinate system; what matters is consistency with the inputs.
-
Three.js does a lot of lazy evaluation, and
compile()is the escape hatch. I'd never reached forrenderer.compile()before. It's underdocumented and easy to miss because it doesn't render anything visible. For any project that swaps textures dynamically, it's the fastest way to eliminate first-use stutter. -
Pointer Events beat separate mouse/touch handling. I'd been writing separate
onMouseMoveandonTouchMovehandlers for years out of habit. The Pointer Events API has been universally supported for ages. One handler covers everything. -
Stop event propagation on UI overlays before writing the bug. The "BH teleports to the slider" bug is the kind of thing that's only obvious in hindsight. Adding
e.stopPropagation()to overlay panels takes one line and prevents an entire category of weirdness when overlays sit on top of an interactive canvas. -
A fragment shader can do more than you think. This whole experience is one quad and 80 lines of GLSL. No geometry, no scene graph, no physics engine. It runs at 60fps on a phone. The simple representation was the right one all along.
The Physics Behind It
If you want to dive deeper into the concepts and the history:
Concepts:
- Gravitational lens - The general theory and the different lensing regimes
- Schwarzschild metric - The exact solution to Einstein's field equations for a non-rotating point mass
- Schwarzschild geodesics - Where the deflection formula α = 4GM/(c²b) comes from
- Einstein radius - The angular scale of the lens
- Einstein ring - What perfect alignment looks like
- Schwarzschild radius - The actual event horizon
- Equirectangular projection - The 2:1 panoramic format that doesn't fit photographs
History:
- Eddington experiment - The 1919 eclipse expedition that confirmed light bending
- Solar eclipse of May 29, 1919 - The eclipse Eddington photographed
- Arthur Eddington - Born 1882, conducted the expedition at age 36
- Tests of general relativity - The broader history of GR confirmations
Real-world lensing:
- Abell 2744 (Pandora's Cluster) - The JWST image used as a background preset
- JWST image release - NASA's February 2023 announcement
- Carina Nebula - Another JWST background preset
- Pillars of Creation - The Eagle Nebula background preset
Tools and APIs:
- React Three Fiber - Declarative Three.js for React
- Three.js WebGLRenderer docs - Including
compile()andinitTexture() - MDN Pointer Events - The unified mouse/touch/stylus event model
Try It Yourself
Open the demo. Some things to try:
- Drag the lens across the JWST Pandora's Cluster background and find the foreground galaxies. When the cursor passes over them, watch how the lens distorts the already-distorted background.
- Crank the mass slider to maximum and notice the Einstein ring filling almost the entire screen.
- Park the lens directly over the brightest pillar in the Pillars of Creation preset and dial the mass slowly up.
- Take a screenshot of the most cinematic frame you can produce and send it to me. I'll add the best ones to the post.
Questions about the implementation, or want to argue with my Eddington framing? Reach out on GitHub or LinkedIn.
Enjoyed this post?
I write about AWS, React, AI, and building products. Have a project in mind? Let's chat.